Today, I will explain how the DHCP (Dynamic Host Configuration Protocol) service works and how a Host obtains a valid IP address on the network. Just a reminder, the use of DHCP is very useful in LANs, as it eliminates the need to manually address hosts.
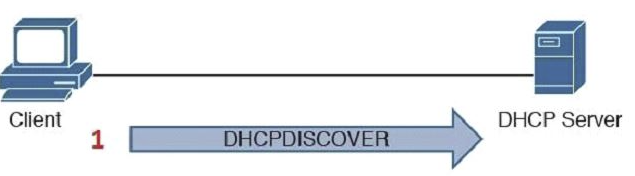
Essentially, the DHCP process operates using the UDP protocol on ports 67/68 and is defined in four stages from the moment a Host requests an IP on the network to the moment it receives a valid IP. In the image below, these stages are clearly visualized.

1st stage – DHCPDISCOVER (BROADCAST): The initial message the Host sends to the network to request an IP address. The Host broadcasts a message from its UDP source port 68 to destination port 67 (0.0.0.0:68 -> 255.255.255.255:67). All devices on the network receive this broadcast message on UDP port 67, and the DHCP server, listening on port 67, responds on the Host’s UDP port 68. Since DHCP uses a specific port, properly configured hosts will not listen on this port, ensuring that a regular host discards the received broadcast package when checking the destination port.
![]()
2nd stage – DHCPOFFER (UNICAST): Once the DHCP server receives an IP request, it responds with an OFFER, providing the Host with all necessary information to join the network, including IP address, DNS, gateway, network domain, WINS, among others. The server responds via UNICAST with its source IP on port 67 and destination port 68 on the Host. While the Host does not have a valid IP, it does have its unique MAC ADDRESS on the network, and the DHCP server, upon receiving DHCPDISCOVER, reserves the IP + MAC of the requester. This allows the server to send the message directly to the Host with Layer 2 information from the OSI model.
3rd stage – DHCPREQUEST (BROADCAST): With a valid IP offer and all required network information, the Host needs to confirm its acceptance to the DHCP server. The Host responds via broadcast to port 67, awaiting server confirmation.
4th stage – DHCPACK (UNICAST): Finally, the DHCP server responds to the requesting Host with a DHCPACK as a confirmation of successful acceptance.
4th stage – DHCPACK (UNICAST): Finally, the DHCP server responds to the requesting Host with a DHCPACK as a confirmation of successful acceptance.
After these four processes, the Host has a valid IP address and all other necessary information for network usage. Note: When the Host’s IP address expires, it will send another DHCPREQUEST to the server to renew the IP, and the server will respond with a DHCPACK granting the right to use the IP again.
To move beyond theory, I configured a DHCP server and a Host to conduct a test and observe the DHCP process using tcpdump.

In the image above, we see a Linux Host requesting an IP via DHCP. We can clearly observe the four stages of the DHCP process we learned in today’s post.
Now, a tcpdump of the exact moment when the Linux Host requested the IP address. ⦁ In the first line, the Host (0.0.0.0) on port 68 sends DHCPDISCOVER via broadcast on port 67. ⦁ In the second line, the DHCP Server (192.168.56.56) on port 67 sends DHCPOFFER via unicast on port 68. ⦁ In the third line, the Host (0.0.0.0) on port 68 sends DHCPREQUEST via broadcast on port 67. ⦁ In the fourth and final line, the DHCP Server (192.168.56.56) sends DHCPACK via unicast on port 68.
In the next DHCP post, I will demonstrate the same process using Wireshark, allowing us to delve deeper into the DHCP process.


Leave a Reply